Castlevania: Lords of Shadow 2 Gameplay Walkthrough w/ SSoHPKC Part 19 - The Antidote
Castlevania: Lords of Shadow Gameplay / Walkthrough w/ SSoHPKC Part 19 - The Crow Witch Malphas
Castlevania: Lords of Shadow 2 Gameplay Walkthrough w/ SSoHPKC Part 20 - Mirror Hunting
Castlevania: Lords of Shadow 2 Gameplay Walkthrough w/ SSoHPKC Part 21 - 10 Minutes of Pain
Castlevania: Lords of Shadow 2 Gameplay Walkthrough w/ SSoHPKC Part 18 - The Mine Fairy
Castlevania: Lords of Shadow 2 Gameplay Walkthrough w/ SSoHPKC Part 23 - Toy Maker Boss Fight
Castlevania: Lords of Shadow 2 Gameplay Walkthrough w/ SSoHPKC Part 16 - Carmilla's Return
Castlevania: Lords of Shadow 2 - Playthrough / Walkthrough - Part #19
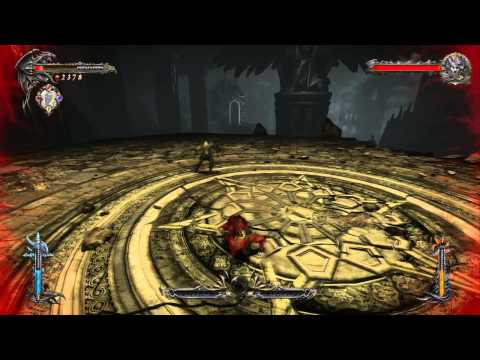
Castlevania: Lords of Shadow 2 Walkthrough - Castlevania: Lords of Shadow 2 - Walkthrough Part 19 - The Blood Curse: Carmilla Boss Battle
Castlevania Lords of Shadow 2 - Part 19 - A Promise Long Forgotten
Castlevania: Lords of Shadow 2 Gameplay Walkthrough w/ SSoHPKC Part 15 - Train of Despair
Castlevania: Lords of Shadow Gameplay / Walkthrough w/ SSoHPKC Part 20 - Colder Times Ahead
Castlevania: Lords of Shadow Gameplay / Walkthrough w/ SSoHPKC Part 21 - Statue Woes
Castlevania: Lords Of Shadow 2 Walkthrough Part 20 Gameplay With Commentary - PC 1080P
Castlevania: Lords of Shadow Gameplay / Walkthrough w/ SSoHPKC Part 18 - The Ogre
Castlevania: Lords of Shadow 2 Gameplay Walkthrough w/ SSoHPKC Part 5 - The Stone Golem
Castlevania: Lords of Shadow Gameplay / Walkthrough w/ SSoHPKC Part 22 - Buddies 4 Lyfe
Castlevania: Lords of Shadow 2 - Part 19 Victor Belmont Boss Fight PC HD Gameplay
Castlevania: Lords of Shadow Gameplay / Walkthrough w/ SSoHPKC Part 17 - Freedom Eagle
Castlevania: Lords of Shadow Gameplay / Walkthrough w/ SSoHPKC Part 2 - Go Ahead and Cheer